
Pixelorama is a free and open-source pixel art editor. Open it above to draw a character, recolor an item, or make animated sprites for a pixel game. The online pixel editor needs no installation. Start with a mouse and keyboard if you want to place single pixels or work across several frames. For more canvas space, use Enter fullscreen below the editor.
How to use Pixelorama online
Follow the same seven steps in the video and the guide below. You'll start with a blank canvas and finish with four 16 × 16 px frames you can import into a pixel game.
1. Create a transparent 16×16 canvas
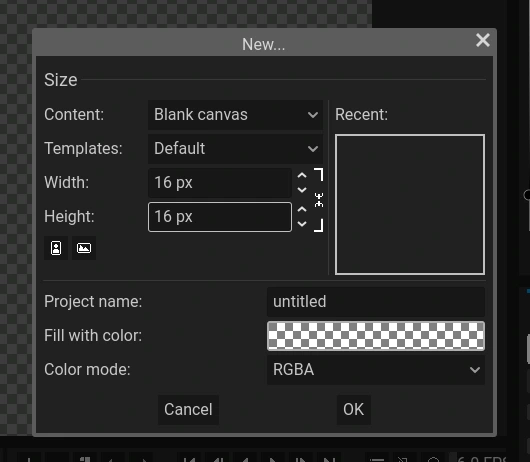
Choose New on the welcome screen or File → New. Select Blank canvas, enter 16 px for both Width and Height, and keep Fill with color checkered. The checkerboard marks transparency. Select OK.
Zoom over the canvas until you can place individual pixels. You can also set the zoom at the top to 2500% and choose View → Center Canvas.
2. Draw and color the neutral pose
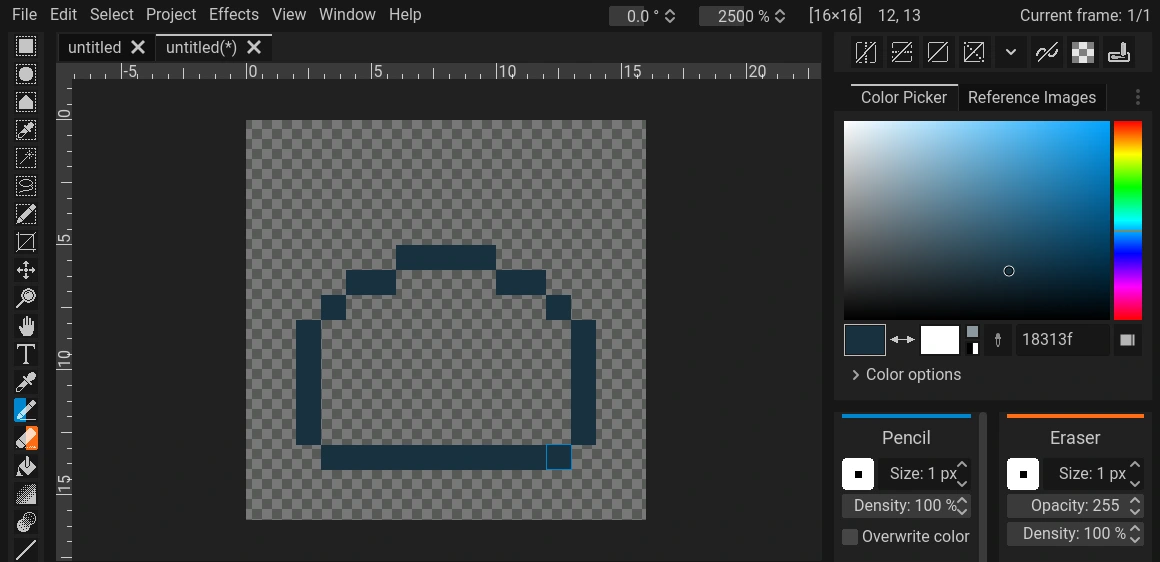
Press P for Pencil, set Size to 1 px, and enter 18313F in the hex field below the Color Picker. Draw a dome with a flat bottom and leave a few empty rows above it. Join the sides to the base so the outline surrounds the body.
Enter 58B96A, press B for Bucket, and click inside the dome. If green fills the checkerboard outside, undo and close the gap with Pencil. Press P again. Add two dark eyes, pale glints with EBFFC5, a rim highlight with A6EC89, and a shadow with 318451.
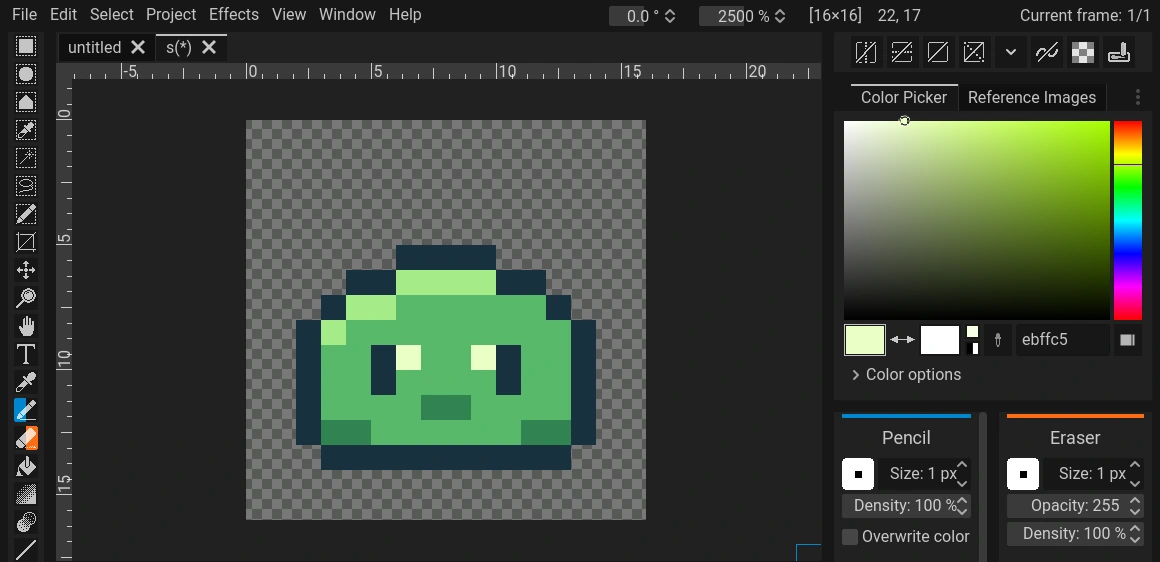
Leave the checkerboard visible around the sprite. Keep its lowest row in the same place in every pose.
3. Clone frame 1 and draw the squash
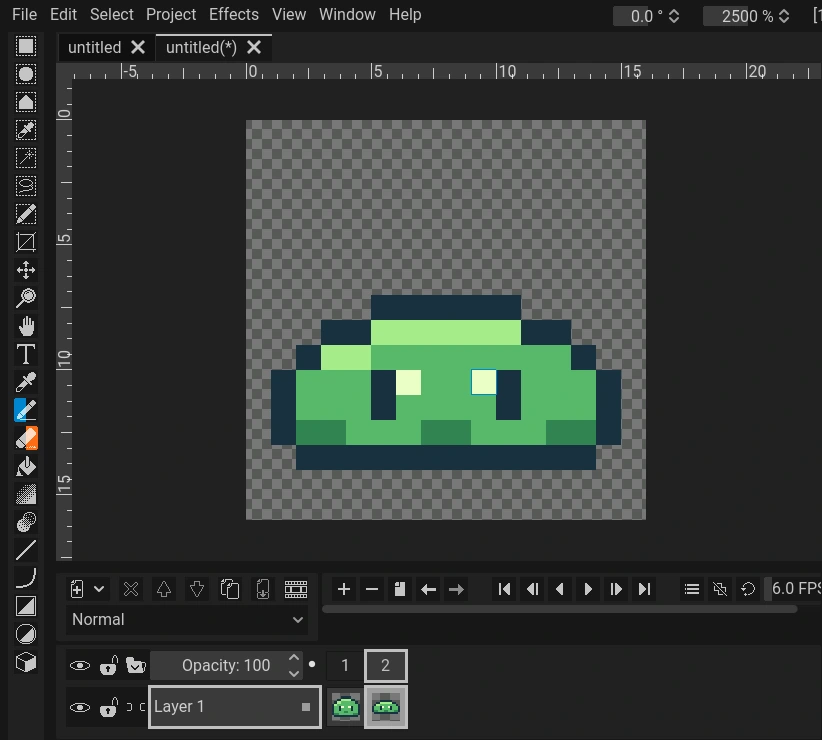
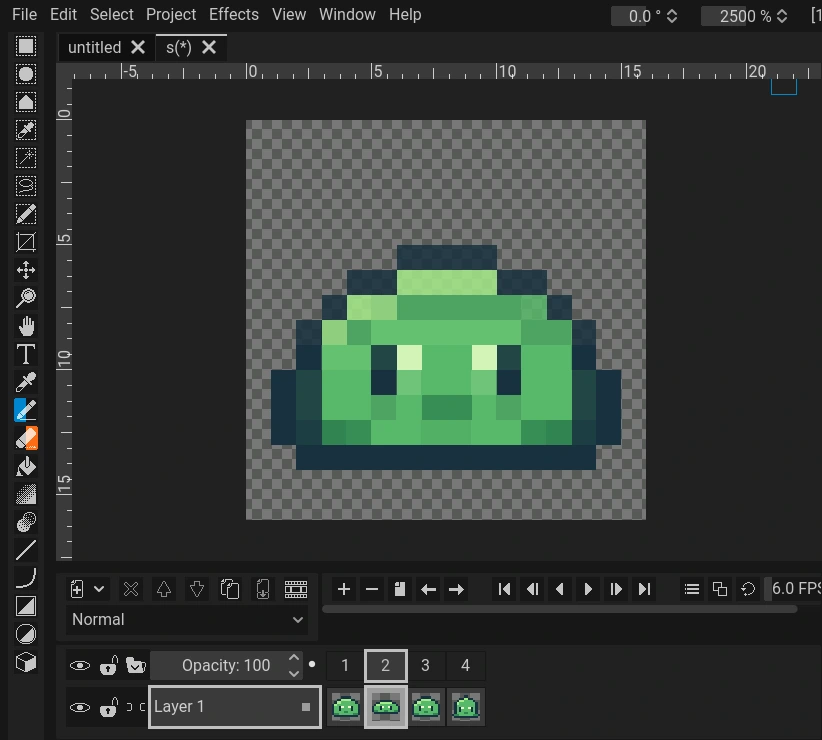
Select frame 1 in the timeline and click Clone Frame, the button between the minus sign and the left/right arrows. Confirm that 2/2 appears at the top right. On frame 2, erase the top of the dome, draw it a little lower, and widen the sides. Redraw the eyes lower in the face and keep the base on the same row. Use Eraser (E) to clear stray pixels and Color Picker (O) to reuse your colors.
4. Add the return pose and stretch
Select frame 1 and click Clone Frame again. The neutral copy appears in slot 2. With that copy selected, click the right arrow next to Clone Frame to move it after the squash. Select the neutral copy in slot 3, clone it, and give frame 4 a higher, narrower top. Keep its eyes visible and its base on the same row.
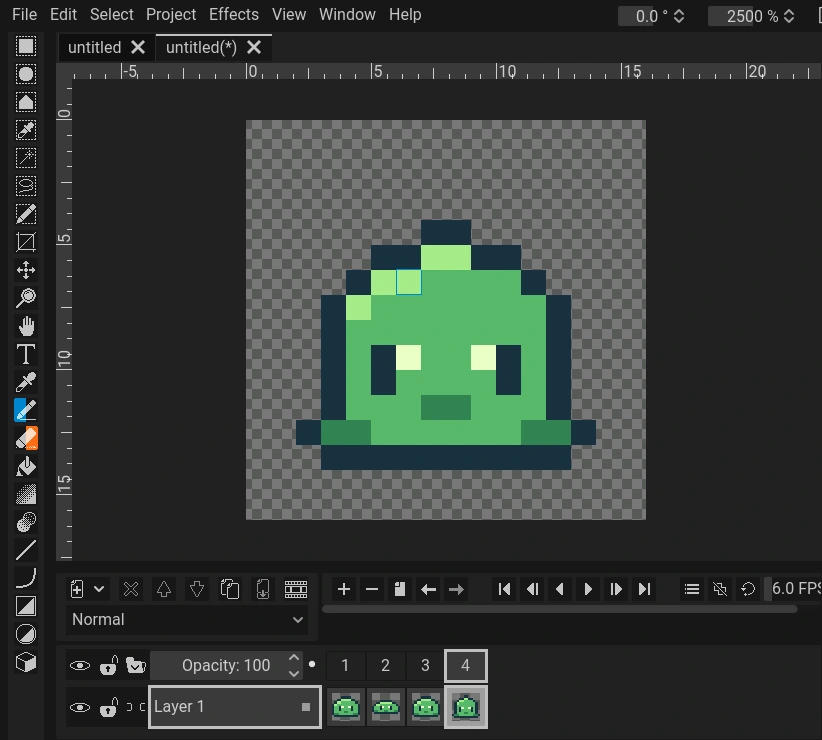
Read the timeline left to right. The poses should be neutral → squash → neutral → stretch.
5. Check the idle loop at 6 FPS
Select frame 2 and toggle Onion Skinning near the playback buttons to compare it with the neutral poses on either side. Line up the bottom edges and check that the eyes stay visible in every pose. Toggle onion skinning off, set 6 FPS, then click Play the animation forward. The body should squash and stretch in place. If it hops, move the base of the drifting frame back into line.
6. Save the editable Pixelorama project
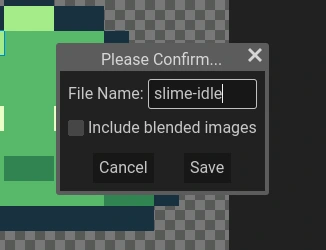
Pause playback and choose File → Save. Enter slime-idle and select Save to download the .pxo file. Reopen it with File → Open whenever you want to edit the frames or layers again.
7. Export the transparent PNG sprite sheet
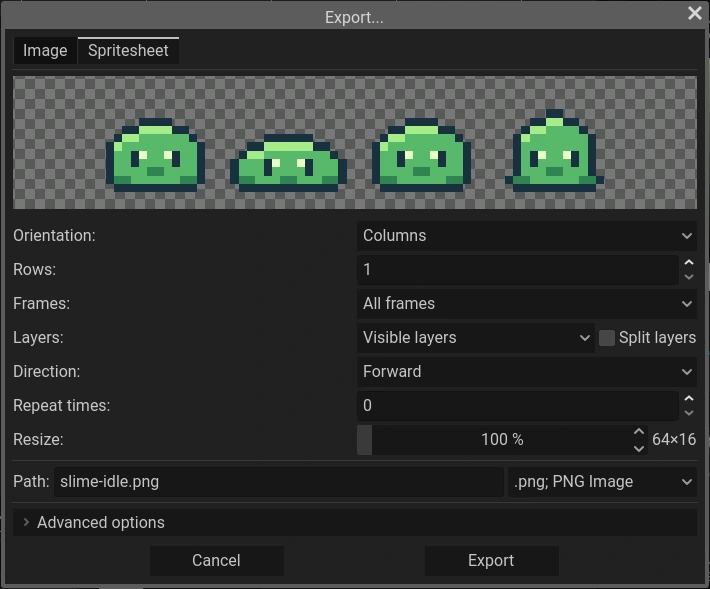
Choose File → Export → Spritesheet. Set Orientation to Columns, Rows to 1, Frames to All frames, and Resize to 100%. Select PNG. Confirm that the preview shows the four poses in order and the dimensions read 64 × 16. Click Export and check your browser's Downloads. For a single pose or a shareable GIF, use the Image tab.

Download the example slime sprite sheet (PNG)
or watch the finished idle loop.
In Godot, slice the PNG into four 16 × 16 px cells in an AnimatedSprite2D node's SpriteFrames animation. Use zero spacing, turn on looping, and set the animation to 6 FPS. Use nearest-neighbor filtering to keep the pixels sharp. Godot sprite animation guide.
Already have a character or item? Find a 16×16 asset with Pixel Search, open the PNG in Pixelorama, and try a recolor or an idle pose. Check the asset license before shipping it in your game. If the slime needs a hit spark or pickup effect, grab a separate animation from Pixel Art Effects and play it over the character in your game.
Draw tiles and build a tilemap in Pixelorama
Give the slime a place to stand. Open a new 128 × 128 canvas, then open the arrow beside Add Layer in the timeline. Choose Tilemap layer and start a rectangular 16 × 16 tileset. In Draw pixels mode, use the tile editor to make a grass tile and a path tile in separate cells. Switch to Draw tiles in the Tiles panel, pick a tile, and stamp it onto the grid with Pencil. Use the tilemap editor to connect the path and check how its edges meet the grass. Pixelorama tilemap guide.
Pixelorama keyboard shortcuts
| Shortcut | Action |
|---|---|
P / E / B / O | Pencil / Eraser / Bucket / Color Picker |
Shift+B | Center the canvas |
Space + drag | Pan around the canvas |
Ctrl+Z / Cmd+Z | Undo |
Ctrl+Shift+Z / Cmd+Shift+Z | Redo |
Ctrl+S / Cmd+S | Save the editable project |
Ctrl+E / Cmd+E | Open the export dialog |
Click inside the editor to give it keyboard focus. If your browser takes over a shortcut, use the corresponding menu. Check or change bindings under Edit → Preferences → Shortcuts.
When Pixelorama gets stuck
- The editor stays blank or stalls. Let the first load finish. If it stays blank, try the Pixelorama web editor in its own tab or use a desktop browser with WebGL 2 and hardware acceleration enabled.
- Pencil leaves no mark. Select the correct frame and cel in the timeline. Check that the layer is visible and unlocked, and that the active color has opacity. Clear any selection that fences off the area you want to draw on.
- The sprite is blurry in your game. Export at 100% and use nearest-neighbor texture filtering in your engine. For a larger PNG to share, use a whole-number scale with Nearest interpolation.
- The file is missing or won't reopen with layers. Check your browser's Downloads and allow the file if the browser blocked it. Use File → Save for the
.pxoyou want to edit again. Use Export when you need a PNG or GIF. Save the project before reloading or closing the editor.
More Pixelorama video tutorials
Watch the Pixelorama tutorial on YouTube.
Pixelorama downloads and alternatives
Is Pixelorama free and safe to download?
The browser editor is free, and you can get Pixelorama for Windows, Linux, or Mac from the project's GitHub Releases. The project is open source under the MIT license. For a desktop install, use the official release links and check the publisher before running the installer. Pixelorama runs on Godot and its source is mostly GDScript. You can inspect the code or report a bug on GitHub. Pixelorama GitHub and downloads.
Can I use Pixelorama on Android or install extensions?
Try the browser editor in landscape to give the canvas more room. If you want a dedicated Pixelorama Android app, the developers offer an experimental build on itch.io. Start with the desktop app if you want to test a Pixelorama extension. Use Edit → Preferences → Extensions to add a compatible extension you trust. Install Pixelorama, Pixelorama extensions.
Pixelorama vs Aseprite, LibreSprite, and Piskel
Explore the three editor interfaces and compare how they handle sprite animation and level design in Pixelorama vs Aseprite vs Sprite Fusion.
- Pixelorama vs Aseprite. Try Pixelorama if you want to draw, animate, and save from a free browser session. If your team already uses
.asepritefiles or Aseprite batch scripts, check your workflow against Aseprite's native project format and export commands. Aseprite export commands. - Pixelorama vs LibreSprite. Both are free and open-source sprite editors. Start with Pixelorama to draw and animate in this browser. Try LibreSprite if you already know the Aseprite workspace or want a C++ sprite editor you can build from source. LibreSprite, LibreSprite build configuration.
- Pixelorama vs Piskel. Try Piskel for a quick browser sprite or a short loop. Try Pixelorama when you want to keep more control over layers, onion skinning, and the sprite sheet layout as your game asset grows. Piskel.
If you're drawing mostly on a phone or tablet, try Pixel Studio. If you need raster and vector tools together, compare PixiEditor. For tile sets and assembling levels from repeated tiles, look at Pyxel Edit. Pixel Studio, PixiEditor, Pyxel Edit.
For Pixelorama examples on Reddit, start with Orama Interactive's community. For a specific tool or menu, use the Pixelorama manual.
Finished slime idle animation
The four poses loop at 6 FPS. Watch the base stay planted as the slime squashes down and stretches up.

Download the slime idle animation (MP4)